Each tube in the main triangle must be cut to length and mitered before the frame is brazed together. Before any cuts are made, I marked each tube with Dykem:
Each tube was marked roughly where the tubes needed to be cut to length, as well as the ends that would be mitered without cutting. Keep in mind that the double-butted tubes have a short end and a long end; the tube is cut to length from the long end to maintain enough of a butt at each end of the tube. The seat tube is single-butted, and is cut to length at the non-butted end. The head tube is not butted and may be cut from either end.
First step - cut the head tube to length. Make sure the tube ends up about 1/4" longer than your design to allow for facing.
There is no need to face the cut at this point, as it will be taken care of when the head tube is reamed after the frame is completed. The rough cut on the head tube:
The next step is to miter the ends of the top tube and down tube that interface with the head tube. To mark the tubes for mitering, I took the Dykem-painted ends, inserted them fully into their appropriate lugs, and scribed around the tube inside the lug. There is also a piece of software available, tubemiter, that will allow you to print out the miter profile and tape the piece of paper to your tube. The software may be more useful if you plan to bend your lugs or fillet braze/weld your frame. Tracing the lugs was quick and simple, but was difficult to get a complete profile around the entire circumference of the tube.
Regardless of how you choose to mark your tubes, it is important to continually fit check your tubes. An angle finder is useful during the mitering process to make sure the tubes are fitting at the correct angle.
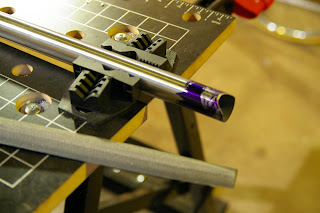
Mitering is accomplished with a half-round bastard file. Here is an image of the beginning of the cut on the top tube, with the scribed profile visible in the Dykem:
After a few minutes, the cut is deeper, but the "shoulders" of the miter are still squared:
Almost done, with rounded shoulders and just about reaching the scribed profile:
A close-up of the finished miter joint:
Fit-checking is accomplished by pressing the mitered profile against the head tube and peering through the joint at a light. Any imperfections in the joint will be noticed by light leaking between the two tubes. Making the miter profile meet the head tube as closely as possible will create a stronger joint.
Checking the top tube against the head tube:
Looking at the inside of the lug, with the mitered tube in place:
After the top tube is done, do the same thing to the end of the down tube that intersects the head tube.
The third miter profile to be cut is the seat-tube-end of the top tube. Before cutting the profile, it is necessary to cut the top tube to length. Be extra careful at this point, because there is no way to "undo" a cut that is too deep; if the tube is cut to too short a length, it must be replaced.
To mark the location of the cut, I installed the top tube and head tube in the top tube lug and then measured from the centerline of the head tube to the desired length of the top tube plus an extra 1/4"-1/2". Essentially, I was looking to be able to fully insert the top tube into the seat tube lug in order to scribe the profile of the miter joint; cutting at the location described above may leave the top tube several millimeters too long, but this can be rectified with filing it down at the seat tube end.
After the top tube has been cut to length, scribe the miter profile as before. To ensure the miter cuts are in the same plane, I kept the head tube in the top tube lug and aligned the seat tube lug using the workbench - the seat tube lug has flat sides which will line up with the head tube when the whole assembly is gently pressed against the (flat) work surface.
Carefully file the joint, making sure to stop occasionally and perform a fit check. You can check for proper length by inserting the seat tube into the seat tube lug and measuring from the centerline of the seat tube to the centerline of the head tube. My first cut ended up about 3 mm too long, which required scribing a second line and carefully (carefully!) removing extra material.
With these cuts complete, the next step is to consider the bottom bracket shell.
Subscribe to:
Post Comments (Atom)


No comments:
Post a Comment